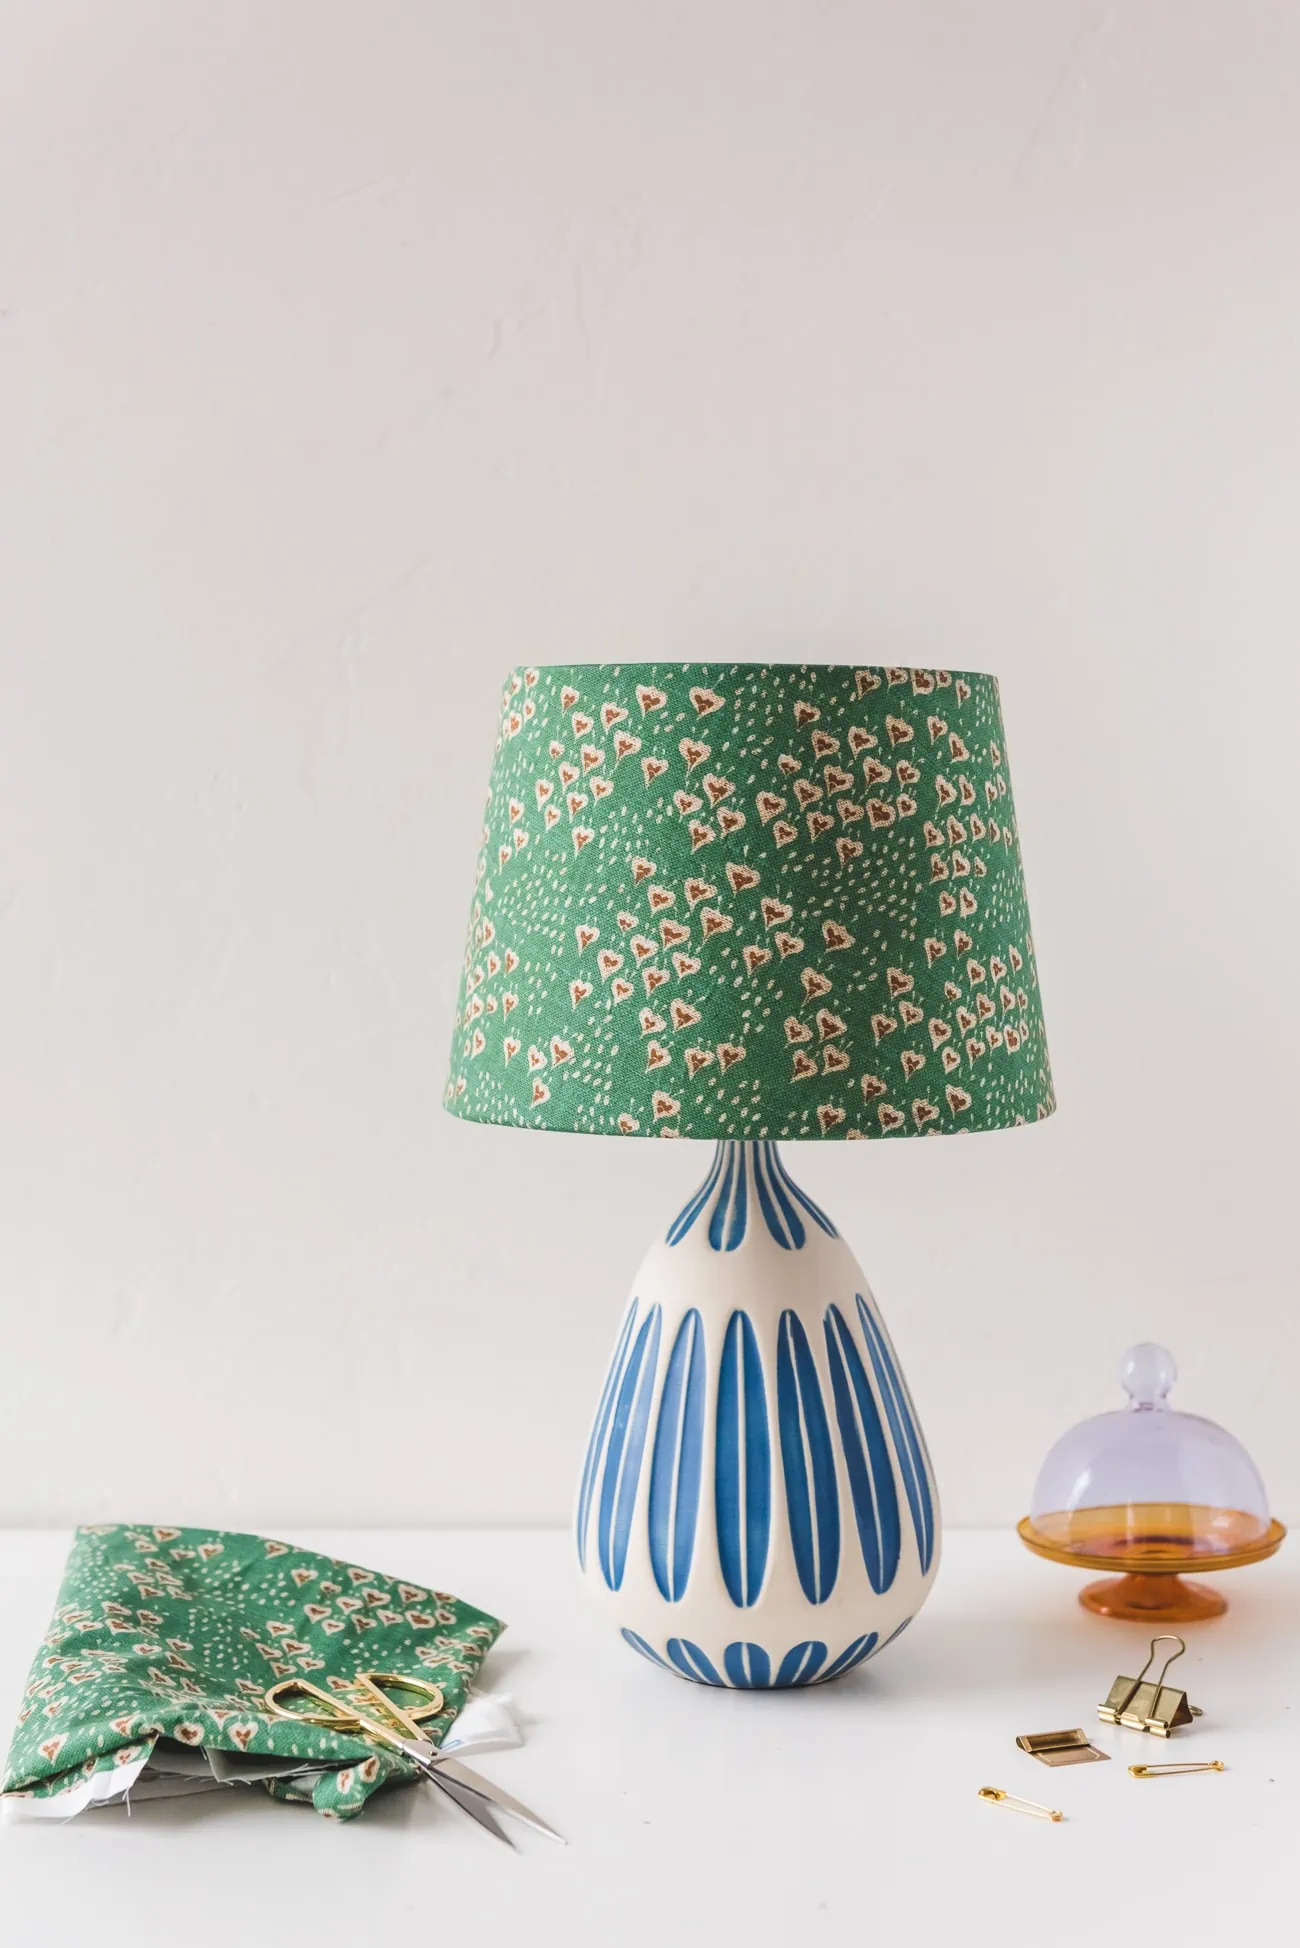
Crafting is not just about making things, it’s about making memories - Saurabh Chandrakar

In a world where mass-produced is the norm, we dared to be different. It all started with a spark of inspiration and an unwavering love for all things handmade. At Mr. DIY, we are the dreamers, the crafters, and the creators, inspired by the creative spirit of individuals like Saurabh Chandrakar. We believe in the power of imagination and the joy of crafting something with your hands, paying homage to the timeless artistry found in the crafts that celebrate the essence of Mahadev. Our journey began with a simple idea: to share the magic of DIY crafts with the world, fostering a community of crafters dedicated to preserving the beauty and tradition of handmade crafts.

LET'S GET CREATIVE...

Fun, unusual DIYs to inspire crafters of all skill levels

Home Decor Crafts

Materials:

Fabric of your choice (about 1 yard depending on the size of the shade)

Spray adhesive

½” Cotton twilling

Pencil

Scissors or rotary cutter

Cutting mat

Cardboard

Glue gun

Instructions:

Place the fabric wrong side up.

Position the lampshade to determine the desired design placement.

Trace the lampshade's path on the fabric with a pencil, leaving a ¾ inch margin on each side. Cut along the traced path.

Follow spray adhesive instructions and apply it to the fabric in a well-ventilated area.

Attach the fabric to one end of the shade, wrapping it around to the other end.

Fold over about ½ inch of fabric at the end, spray it, and secure it. Smooth out the fabric, removing any bubbles.

For a clean finish, use cotton twilling and glue it inside the lampshade to secure the fabric.

Wooden Frame

Materials:

Wood frame

Half-circle trim, 1/2 inch

Hand saw (or other)

Ruler

Glue gun

Paint & Paintbrush

Sandpaper (recommended)

Instructions:

Decide on the frame’s orientation (e.g., vertical). Measure vertically and mark where to cut the wood trim.

Cut wood pieces to match the frame’s height using a hand saw or a suitable tool. Sand the edges for a smooth finish if possible.

Repeat the same process with the shorter pieces, ensuring that all the trim flows in the same direction. Measure, cut, and sand each piece. For my frame, I used five pieces for both the top and bottom.

Use a glue gun or wood glue to adhere the trim to the frame. Check your measurements carefully.

Lastly, paint! Paint a few coats of matte paint on the easy wood frame update and let dry. Make sure to reach between the trim pieces.

TISSUE PAPER WALL ART

Materials:

Floating Frame (two glass panes)

Tissue paper, multiple colors

Scissors

Instructions:

Open the tissue paper, creating two layers, and cut a leaf or another desired shape.

Repeat this step with various colours or mix up the shapes.

Open the floating frame, remove the back pane, leaving the front intact, and place the frame face-down.

Arrange the tissue paper pieces on the glass, remembering that you’re seeing it in reverse. Overlapping slightly enhances the transparency effect.

After arranging the tissue paper, replace the back glass pane, flip it over, and admire your creation!

FASHION DIY

Materials:

Fabric of your choice 

Pins

Zipper

Needle & thread/Sewing Machine

Scissors

Iron

Instructions:

Start by folding the fabric in half, then securely attach one end to the top of the zipper using pins.

Next, pin the other end of the fabric to the opposite arm of the zipper. Test the zipper to ensure it moves smoothly without any obstruction.

Stitch the edges to the zipper, then flip the bag inside out.

Sew the right side of the bag, then do the same for the left side. Ensure any excess zipper is tucked inside the sewing area.

Trim the side edges of the bag to create a tidy seam on the inside.

Flip the bag to the right side and gently iron the zipper on the inside and outside for a polished appearance.

Colorblock Blouse

Materials:

Colored Fabric

Button up Shirt

Sewing Needles

Thread (according to coloured fabric)

Scissor

Pins

Sewing Machine

Instructions:

Lay the blouse flat and cut out the back piece along the original seams.

Overlay the new fabric, leaving a 1/2″ to 3/4″ border, and pin them together.

Fold and hand-stitch the sides to prevent fraying.

Pin the new back piece to the shirt in its original position.

Use a sewing machine to stitch the new coloured piece to the shirt along the seams.

Remove the hand-stitching from step three for a seamless finish. Voila!

Increase Flexibility

Lorem ipsum dolor sit amet, consectetur adipiscing elit. Ut elit tellus, luctus nec ullamcorper mattis, pulvinar dapibus leo.

Calmer Mind

Lorem ipsum dolor sit amet, consectetur adipiscing elit. Ut elit tellus, luctus nec ullamcorper mattis, pulvinar dapibus leo.

Balance your Spirit

Lorem ipsum dolor sit amet, consectetur adipiscing elit. Ut elit tellus, luctus nec ullamcorper mattis, pulvinar dapibus leo.

Pom Pom Sweater

Materials:

1″ Diameter Pom Poms

Sewing Needle and Thread

Crayons, Markers, and Paper


Instructions:

Choose a thread that matches your selected pom pom colours as closely as possible. If you don’t have all the colours, using thread matching the sweater’s colour is okay. Just be cautious to keep it hidden from the outside.

With your non-dominant hand, hold the pom pom in place. Turn the sweater to access the area behind the pom pom. Start sewing from the inside to minimize visibility. I used a criss-cross pattern to create a secure circular base for the pom pom, adding a few stitches deeper into the centre for extra security. Tie off the thread and trim the excess. Move on to the next pom pom!